Traditional Ukrainian Pampushky Recipe: Authentic Garlic Rolls for Borscht
Total Time: 2 hours 30 min (40 min active) | Makes: 12 rolls | Difficulty: Intermediate
Quick Overview
- Proof yeast in warm milk with sugar — 10 minutes
- Mix and knead dough until smooth — 12 minutes
- First rise until doubled — 1 to 1.5 hours
- Shape into balls, arrange in pan, second rise — 35 minutes
- Bake until golden, brush immediately with garlic oil — serve right away
The Story Behind Pampushky
In Ukrainian kitchens, there is an unspoken rule: borscht comes with pampushky. Not sometimes. Always. These soft, yeasted garlic rolls have been on Ukrainian tables for so long that serving borscht without them feels wrong.¹
Pampushky (помпушки) come from the agricultural heartland of central Ukraine, particularly the regions of Poltava and Kyiv oblasts, where wheat was the main crop and bread-making was taken seriously from one generation to the next. The name most likely traces back to the German Dampfnudel, steamed dumplings that traveled east through cultural exchange, though Ukrainians took the recipe and made it entirely their own over time.²
The earliest pampushky were not baked at all. They were fried in lard (smalets). The baked version, brushed with raw garlic, sunflower oil, and fresh dill, became the standard gradually — particularly in central and eastern Ukraine where sunflower oil was the everyday cooking fat.³
For Ukrainian communities outside Ukraine, baking pampushky is a way of staying connected. The Ukrainian word for bread, khlib, has always carried more weight than food alone. Offering bread to guests was offering something of yourself. A batch of pampushky on a weeknight dinner table still says the same thing.
Traditional Pampushky — Authentic Ukrainian Garlic Rolls
Recipe developed independently by Heritage Healthy Kitchen, based on traditional Ukrainian culinary methods. Links for further reading provided at the end of this article.¹²³
Ingredients
For the Dough
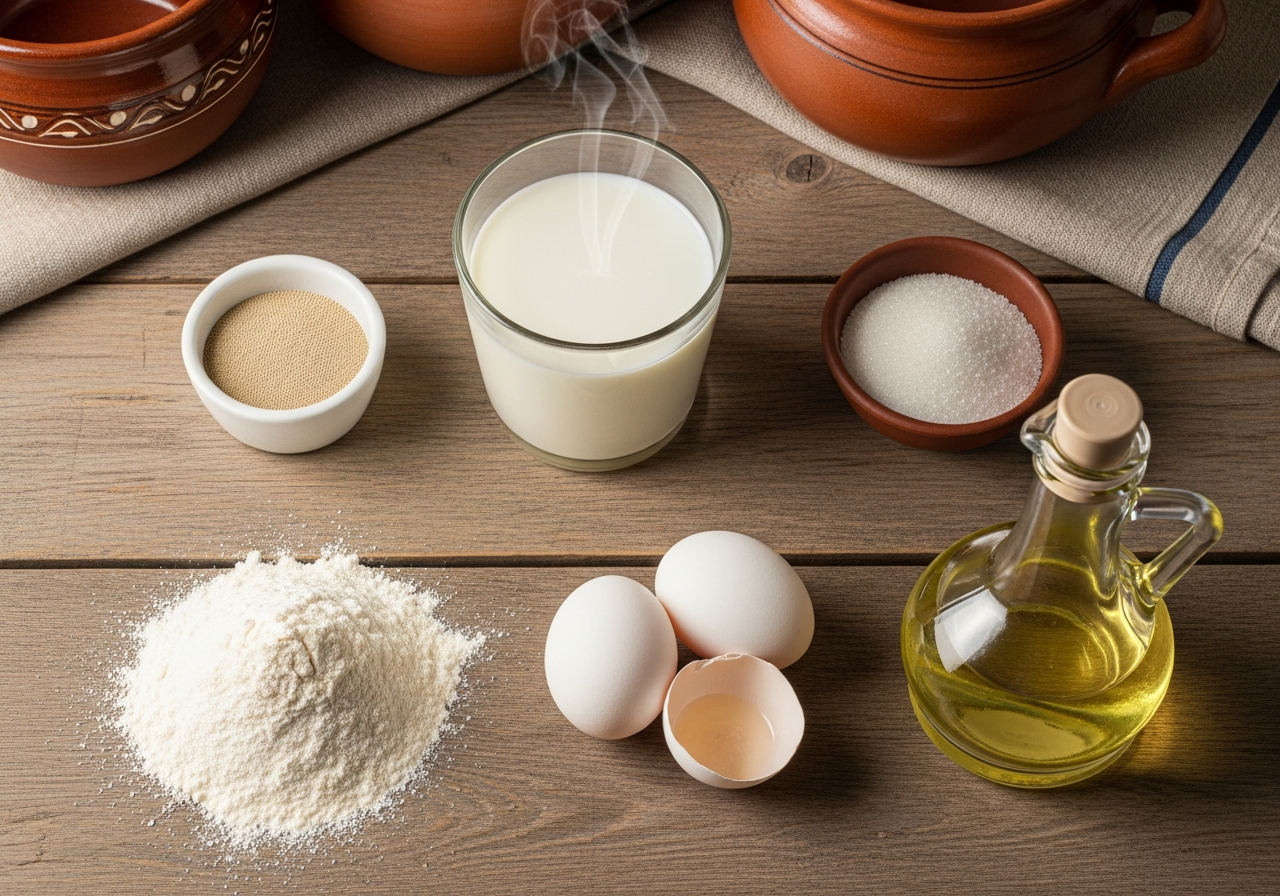
- 3½ cups (440g) all-purpose flour, plus extra for dusting
- 2¼ tsp (7g / 1 packet) active dry yeast
- 1 cup (240ml) warm whole milk (~38°C / 100°F)
- 2 tbsp granulated sugar
- 1 tsp fine sea salt
- 2 large eggs, room temperature
- 3 tbsp cold-pressed sunflower oil, plus extra for greasing
For the Garlic Topping
- 4–5 large garlic cloves, pressed or very finely minced
- 3 tbsp unrefined sunflower oil
- 2 tbsp warm water
- ½ tsp fine sea salt
- 3 tbsp fresh dill and/or flat-leaf parsley, finely chopped
For Finishing
- 1 egg yolk mixed with 1 tbsp milk (egg wash for glazing)
Instructions
- Proof the yeast. Combine warm milk, sugar, and yeast in a small bowl. Stir once and leave for 8–10 minutes. The surface should turn foamy and smell yeasty. No foam after 10 minutes means the yeast is dead — start with a fresh packet.
- Mix the dough. Combine flour and salt in a large bowl. Make a well in the center and add the yeast mixture, eggs, and sunflower oil. Stir with a wooden spoon until a rough dough forms, then turn out onto a lightly floured surface.
- Knead. Knead by hand for 10–12 minutes. The finished dough should be smooth, supple, and slightly tacky. Not sticky, not stiff. Press a finger in and it should spring back slowly. This is what gives pampushky their soft crumb rather than a bready texture.³
- First rise. Shape the dough into a ball, place in a lightly oiled bowl, cover with a clean towel or plastic wrap, and leave somewhere warm for 1 to 1.5 hours until doubled. For a more developed flavor, refrigerate the covered dough after the first 30 minutes and let it rise slowly overnight. The difference is noticeable.
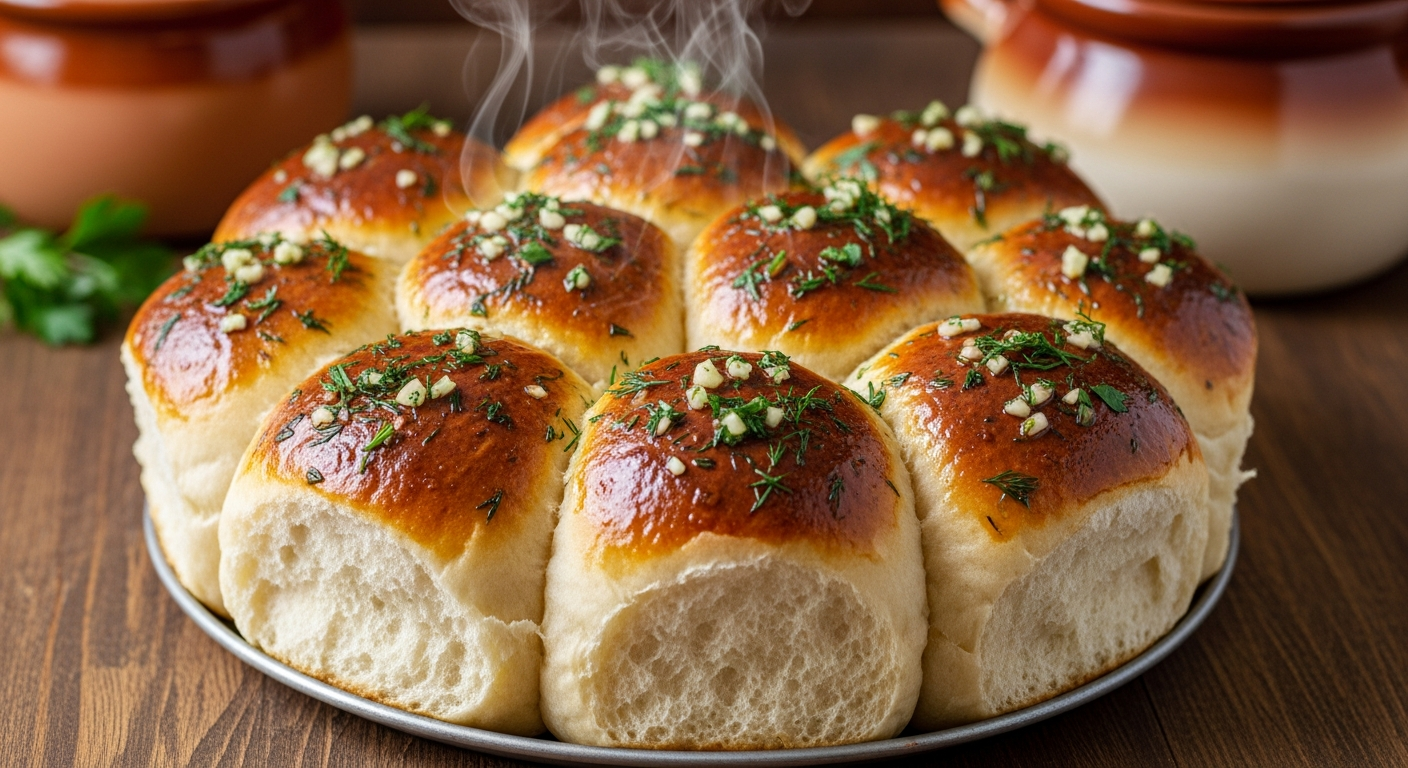
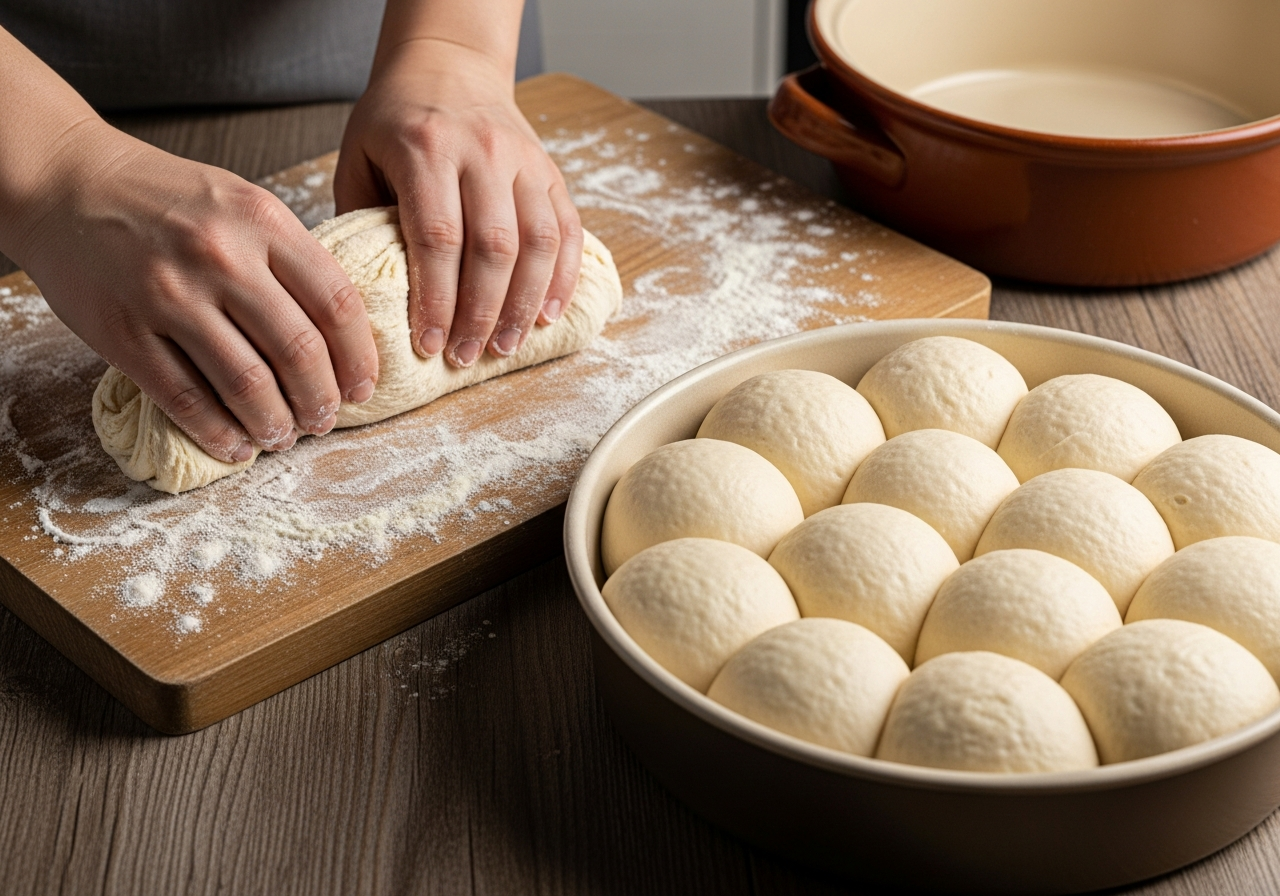
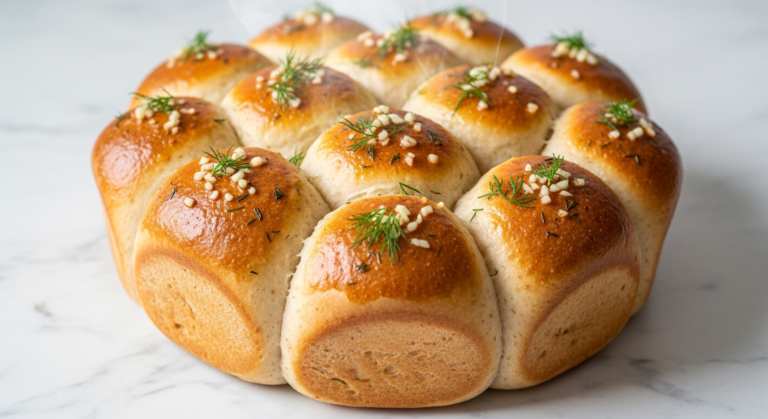
- Shape the rolls. Punch the dough down gently. Divide into 12 equal pieces, about 65–70g each. Roll each piece into a tight, smooth ball using a cupped palm and short circular motions on the work surface. This is the traditional shaping method that creates the characteristic round, domed top.
- Second rise. Lightly oil a 25cm (10-inch) round baking pan. Arrange the balls snugly so they touch each other. This is intentional. Rolls baked in contact stay softer on the sides and rise upward rather than outward. Cover loosely and leave 30–40 minutes until visibly puffed.
- Glaze and bake. Preheat the oven to 190°C (375°F). Brush the risen rolls carefully with egg wash. A light, even coat is what gives the deep golden color. Bake on the center rack 20–25 minutes, until a rich golden-brown and hollow-sounding when tapped underneath.
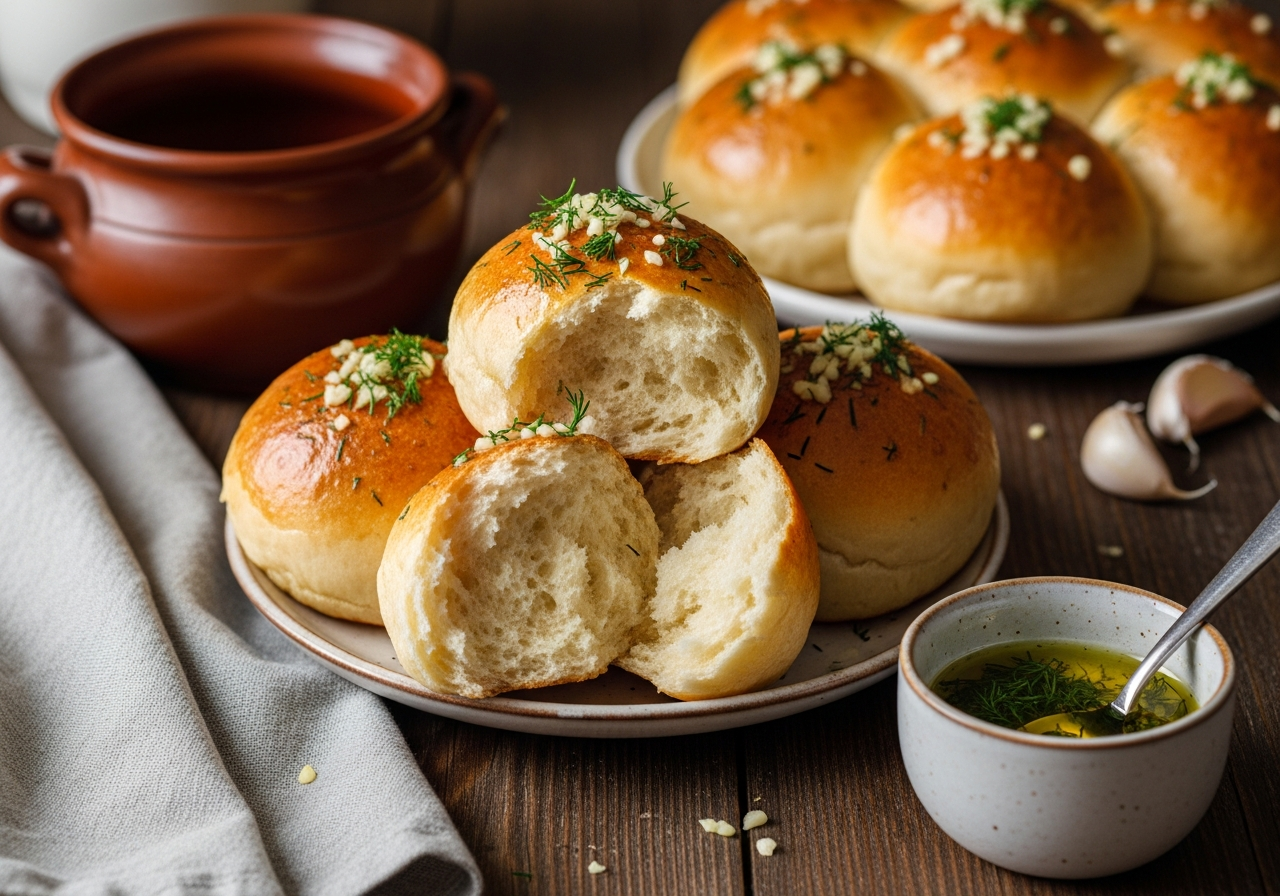
- Prepare the garlic topping. While the rolls bake, whisk the garlic, sunflower oil, warm water, and salt together until combined. Stir in the chopped herbs. Keep at room temperature until needed.
- Brush immediately. The moment the pampushky come out of the oven, brush all of the garlic topping over them while they are still steaming and most absorbent. Use every drop. Serve right away alongside a bowl of borscht.¹
Kitchen Wisdom & Pro Tips
Use unrefined sunflower oil, not olive oil. It is the traditional fat for this recipe, and the slightly nutty, roasted aroma it brings to both the dough and the garlic topping is specific to Ukrainian cooking. Olive oil works as a substitute, but the flavor is different.²
Do not add too much flour. The dough should feel slightly tacky throughout kneading. A stiff, dry dough produces dense rolls. If the dough sticks to your hands, add flour one tablespoon at a time — not all at once.³
Bake the rolls touching each other. The contact between rolls during baking creates the soft, pale sides that are the mark of properly made pampushky. Spacing them apart produces a harder crust all around, which is a different thing entirely.
Make-ahead option: after the first rise, shape the dough balls and refrigerate covered for up to 48 hours. Before baking, leave at room temperature for 30 minutes, then do the second rise and bake as normal. Apply fresh garlic topping the moment they come out of the oven.³
Nutritional Information
Per serving (1 roll with garlic topping, based on 12 rolls per batch)
- Calories: approximately 245 kcal
- Protein: 6.5g
- Total fat: 9g (predominantly unsaturated, from sunflower oil)
- Carbohydrates: 34g
- Dietary fiber: ~1.2g
- Sugar: 2.5g
- Sodium: 210mg
Nutritional values are estimates based on standard ingredient databases and will vary depending on specific ingredients, brands, and measurements used.
Storage and Reheating
Pampushky are best eaten the day they are baked, ideally within an hour of coming out of the oven. Store leftovers in an airtight container or wrapped in a kitchen towel at room temperature for up to 2 days. Do not refrigerate — cold temperatures stale yeasted bread quickly.¹
To freeze: cool the rolls completely and freeze without the garlic topping in a single layer before transferring to a freezer bag. They keep for up to 2 months. Always make a fresh garlic topping after reheating.
To reheat from room temperature: wrap loosely in foil and warm at 170°C (340°F) for 8–10 minutes. From frozen: 180°C (355°F) for 15–18 minutes foil-on, then 3 minutes foil-off. Brush with fresh garlic topping the moment they come out.
Microwave reheating is not recommended — it makes the texture gummy and dulls the crust.
Looking for a Lighter Version?
If you want a lighter take on this dish, see our Healthy Pampushky.
Traditional Ukrainian Pampushky
Ingredients
For the Dough
- 3½ cups (440g) all-purpose flour, plus extra for dusting
- 2¼ tsp (7g / 1 packet) active dry yeast
- 1 cup (240ml) warm whole milk (~38°C / 100°F)
- 2 tbsp granulated sugar
- 1 tsp fine sea salt
- 2 large eggs, room temperature
- 3 tbsp cold-pressed sunflower oil, plus extra for greasing
For the Garlic Topping
- 4–5 large garlic cloves, pressed or very finely minced
- 3 tbsp unrefined sunflower oil
- 2 tbsp warm water
- ½ tsp fine sea salt
- 3 tbsp fresh dill and/or flat-leaf parsley, finely chopped
For Finishing
- 1 egg yolk mixed with 1 tbsp milk (egg wash for glazing)
Instructions
- Proof the yeast. Combine warm milk, sugar, and yeast in a small bowl. Stir once and leave for 8–10 minutes. The surface should turn foamy and smell yeasty. No foam after 10 minutes means the yeast is dead — start with a fresh packet.
- Mix the dough. Combine flour and salt in a large bowl. Make a well in the center and add the yeast mixture, eggs, and sunflower oil. Stir with a wooden spoon until a rough dough forms, then turn out onto a lightly floured surface.
- Knead. Knead by hand for 10–12 minutes. The finished dough should be smooth, supple, and slightly tacky. Not sticky, not stiff. Press a finger in and it should spring back slowly. This is what gives pampushky their soft crumb rather than a bready texture.³
- First rise. Shape the dough into a ball, place in a lightly oiled bowl, cover with a clean towel or plastic wrap, and leave somewhere warm for 1 to 1.5 hours until doubled. For a more developed flavor, refrigerate the covered dough after the first 30 minutes and let it rise slowly overnight. The difference is noticeable.
- Shape the rolls. Punch the dough down gently. Divide into 12 equal pieces, about 65–70g each. Roll each piece into a tight, smooth ball using a cupped palm and short circular motions on the work surface. This is the traditional shaping method that creates the characteristic round, domed top.
- Second rise. Lightly oil a 25cm (10-inch) round baking pan. Arrange the balls snugly so they touch each other. This is intentional. Rolls baked in contact stay softer on the sides and rise upward rather than outward. Cover loosely and leave 30–40 minutes until visibly puffed.
- Glaze and bake. Preheat the oven to 190°C (375°F). Brush the risen rolls carefully with egg wash. A light, even coat is what gives the deep golden color. Bake on the center rack 20–25 minutes, until a rich golden-brown and hollow-sounding when tapped underneath.
- Prepare the garlic topping. While the rolls bake, whisk the garlic, sunflower oil, warm water, and salt together until combined. Stir in the chopped herbs. Keep at room temperature until needed.
- Brush immediately. The moment the pampushky come out of the oven, brush all of the garlic topping over them while they are still steaming and most absorbent. Use every drop. Serve right away alongside a bowl of borscht.¹
Frequently Asked Questions
What does pampushky mean?
Pampushky (помпушки) is the plural of pampushka. In everyday Ukrainian, the word is also used affectionately to describe a beautiful, round-cheeked woman — the same quality that describes these rolls well: soft, round, warm.²
Can I use olive oil instead of sunflower oil?
Yes, olive oil works. But unrefined sunflower oil is the traditional choice in Ukrainian cooking, and you’ll notice the difference in the finished roll. Most Eastern European grocery stores carry it.²
My rolls came out dense. What went wrong?
Most likely too much flour was added during kneading, or the kneading time was cut short. Also check the yeast — no foam during proofing means the yeast was not active. With pampushky, all three steps matter: proper dough hydration, full kneading time, and a complete rise.³
Are pampushky always savory?
No. There are two distinct traditions. The savory garlic rolls served with borscht are a central and eastern Ukrainian tradition. In western Ukraine, sweet fried pampushky — similar to doughnuts — are filled with jam or poppy seeds and served at Christmas dinner (Sviata Vecheria). They share a name but are entirely different foods.³
Can I make them without eggs?
Yes. Omit the eggs and increase the milk by 3–4 tablespoons. The rolls will be slightly less rich but still work. Plant-based milk also works for a dairy-free version.
How do you say pampushky?
Pam-POOSH-ky (plural) / pam-POOSH-ka (singular). Worth saying out loud before serving.²
Can I prepare them the night before?
Yes. After the first rise, arrange the shaped balls in the oiled pan, cover tightly, and refrigerate overnight. The next morning, leave at room temperature for 30 minutes, complete the second rise, and bake. The slow cold fermentation also improves the dough flavor noticeably.
Looking for a Lighter Version?
If you want to keep the character of this recipe with more fiber and a different fat profile, see our Healthy Pampushky recipe — made with a whole wheat and all-purpose flour blend and cold-pressed olive oil in the garlic topping.
Further Reading & Sources
The following sources were consulted in researching the history and technique behind traditional Ukrainian pampushky. Heritage Healthy Kitchen’s recipe was developed independently; these links are provided for readers who want to explore further.
- Voloshyna, Anna. “Ukrainian Garlic and Dill Pampushky.” Anna Voloshyna. annavoloshyna.com — personal account and recipe from a Ukrainian chef. Confirms the inseparable borscht-pampushky tradition.
- Victor. “Pampushki.” Taste of Artisan. tasteofartisan.com — detailed traditional recipe with notes on technique, sunflower oil use, and serving customs.
- Nataliia. “Ukrainian Pampushky (Garlic and Dill Bread Rolls).” Sava’s Kitchen. savaskitchen.com — includes historical notes on fried pampushky origins and the science behind high-hydration dough for soft rolls.
Disclaimer
The information in this article is provided for educational and informational purposes only. Heritage Healthy Kitchen makes no representations or warranties regarding the accuracy or completeness of any content on this site. Nutritional values are estimates only and will vary depending on the specific ingredients, brands, and measurements used. This content is not intended as dietary, medical, or professional nutritional advice. Always consult a qualified healthcare provider regarding any dietary needs or health conditions. Heritage Healthy Kitchen is not responsible for any outcomes resulting from the use of recipes or information published on this site.
You Might Also Like
More heritage recipes from our kitchen
Leave a Reply